Next article regarding Groundwork, a very good monitoring and reporting environment. I already integrated WeatherMap with Groundwork (the community edition), or added a Security Dashboard. Now, let see how to integrate a Wiki into Groundwork.
A Wiki is an online collaborative tool where everybody can update the pages content directly from a browser without specific HTML knowledge. A well-known example of Wiki is the free enclyclopedia Wikipedia.
Added to a monitoring tool, a Wiki can provide a valuable knowledge base:
- Information about hosts and services: location, owner, config, installed base, support contract number
- Emergency procedures: how to restart the system, what action to take in case of incidents
- History of changes and maintenance
- …
Note: A Wiki will not replace professional tools but it can help you to build a change management procedure.
1. Wiki Installation
The choice and installation of a Wiki won’t be covered here. Feel free to use your favorite Wiki application. Personally, I use WikkaWiki.
This article assumes that the Wiki was installed on the same server as Groundwork. On a security point of view, it’s the best choice:
- Wiki integration into the Groundwork web interface via the Wrappit tool.
- Enable the Single Sign On (SSO) feature to prevent unauthorized access to the Wiki pages (which will potentially contain sensitive data!)
- Groundwork is usually available remotely via a VPN or reverse-proxy. By using a single server to host the Wiki and Groundwork you reduce the amount of changes to apply in policies or ACLs.
- Finally, if you run Groundwork over HTTPS, your Wiki will benefit of the same protection.
Finally, this article assumes that the Wiki is configured to provide URL pages as “http://your.groundwork.server/wiki/xxxxxxxx“.
2. Groundwork Configuration
As Groundwork uses the Nagios engine, we will use the feature proposed by Nagios: the Extended Host/Service Information. It allows you to specify a custom logo or external URL to better describe your hosts or services.
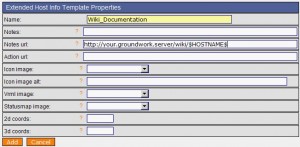
To configure this feature in Groundwork, go to Configuration , Hosts, Host Extented Info and create a new template:
 |
Note the URL format: It accepts Nagios macro like $HOSTNAME$ or $HOSTADDRESS$!
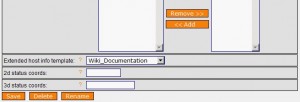
Then, for all your hosts (it’s better to fix it once in the default profile), select the created extended info template:
 |
Then reload the Groundwork configuration (commit changes). But there is one major problem at thr momemt: the URL configured abose is only available on the old Nagios pages and not from the Status Viewer nor the dashboards! I contacted the Groundwork support to report this problem. They found this feature valuable but are not able to propose it right now (maybe in the next release?). Luckily Simon (working at Groundwork) provided me a way to achieve my request. Thanks Simon!
3. Groundwork Patching
To display the Wiki URL in the Groundwork main pages, there are two files to be patched:
/usr/local/groundwork/guava/packages/sv2/templates/host.xml
/usr/local/groundwork/guava/packages/sv2/templates/service.xml
Patches are available here: host.diff and service.diff. Copy them on your Groundwork server and apply them:
# cd /usr/local/groundwork/guava/packages/sv2/templates
# wget https://blog.rootshell.be/wp-content/uploads/2008/07/host.diff
# wget https://blog.rootshell.be/wp-content/uploads/2008/07/service.diff
# patch <host.diff host.xml
# patch <service.diff service.html
Warning! The patches are provided “as is” and are not supported by Groundwork nor myself. They worked for my Groundwork installation. Also, there are risks to have the patched files overwritten during any future upgrades!
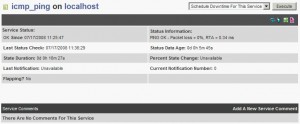
Log out Groundwork, clear your browser cache and log again. You should now see host and service names converted to URLs in the Status screen and Dashboard:
 |
 |
When a page does not already exist, the normal Wiki behavior is to create a new empty page. Now, the biggest challenge is for you: Fill the pages with all your hosts and services data and keep them updated! Feel free to exchange your experiences or suggestions.
I tried to edit that Wakka.class.php but that didn’t seem to do it for me. What ended up allowing me to put the dash symbol in there was editing the wikka/handlers/page/edit.php file and changing the VALID_PAGENAME_PATTERN to this:
if (!defined(‘VALID_PAGENAME_PATTERN’)) define (‘VALID_PAGENAME_PATTERN’, ‘/^[A-Za-zÄÖÜßäöü,\-]+[A-Za-z0-9ÄÖÜßäöü,\-]*$/s’); /
Thank you Xavier for all the help!
Don’t care! The most important patch is the one for function IsWikiName()ç!
Looks like what I need, but can you tell me what the charactors are for the:
ÄÖÜ,ßäöü
in the syntax, or do I put those charactors in there?
Ok, in this case, you need to patch WikkaWiki to accept Wiki names in the format of your Groundwork host names.
Go to your Wiki installation tree (precisally the /libs directory) and patch the file below. The function which interests us is IsWikiName(). Enjoy!
(Note that the regexp must be adapted to catch your host names format)
diff Wakka.class.php Wakka.class.php.20080327 992,1004c992,1004 < // elseif (preg_match("/[^[:alnum:]]/", $tag)) < // { < // // check for email addresses < // if (preg_match("/^.+\@.+$/", $tag)) < // { < // $url = "mailto:".$tag; < // } < // // check for protocol-less URLs < // else if (!preg_match("/:/", $tag)) < // { < // $url = "http://".$tag; < // } elseif (preg_match("/[^[:alnum:],ÄÖÜ,ßäöü]/", $tag)) > { > // check for email addresses > if (preg_match("/^.+\@.+$/", $tag)) > { > $url = "mailto:".$tag; > } > // check for protocol-less URLs > else if (!preg_match("/:/", $tag)) > { > $url = "http://".$tag; > } > } 1018c1018 < function IsWikiName($text) { return preg_match("/^[A-Za-z0-9.]*$/", $text); } --- > function IsWikiName($text) { return preg_match("/^[A-Z,ÄÖÜ][a-z,ßäöü]+[A-Z,0-9,ÄÖÜ][A-Z,a-z,0-9,ÄÖÜ,ßäöü]*$/", $text); }Sorry, should have put that I am using WikkaWiki as in the example given.
Depending on the Wiki software you use, you have to patch it to accept WikiLinks compatible with your servers naming convention (xxxx-999) in your case.
Unfortunately, I can’t help you more at the moment. What’s your Wiki ?
Great tip! I got just about everything except that some of our server names contain the ‘-‘ charactor. When trying to create the new page from the server name ‘server-1’ for example it fails with the error: This page name is invalid. Valid page names must start with a letter and contain only letters and numbers. Do you know if there is a way to disable that check or at least remove the ‘-‘ as a invalid charactor? Thank you for the how-to.
No problem, always nice to receive feedback from readers!
You do not need to activate authentication at Wiki level if properly integrated into Groundwork via the ‘Wrappit’ tool with SSO enabled. The only requirement is the Wiki location: it must run on the same webserver as Groundwork.
Hello there,
Sorry for posting at an older article..but I’m trying to follow your guide and one thing puzzles me if you can help me out.
Can I make the wiki take the username from GroundWork and automatically be authenticated with that ?
I’m trying to avoid having the wiki work with anonymous users.