 Groundwork is a well-known monitoring tool. In my job, I deploy Groundwork servers from small to quite very-complex infrastructures: it’s an amazing application. I’ll not describe it here, just go to the official web site for a detailed review. Groundwork is available in three versions: full open source and two commercial releases (small business and professional). The professional one has optional packages. One of them is called NMS and adds extra tools like Cacti, Ntop, Weathermap or NeDi). As Groundwork is based on open source solutions, it’s really “open” and can be customized. I’ll discuss here about the integration of Weathermap into the open source version!
| Weathermap is a network visualization tool. It does not have a polling tool but rather takes data from multiple sources like RRD, MRTG (RRD and old log-format), or tab-delimited text files and draw a map of your network with colors (colors depend on the link usage). With one screen, you can have an instant overview of the traffic flows on your network. As Groundwork provide performance graphs based on RDD, why not use them to build nice maps like this example on the right? |  |
The integration was performed on a Debian 4.0 host running Groundwork 5.1.0 (for Ubuntu). All settings were kept standards.
The following steps will be reviewed:
- Requirements
- Weathermap installation.
- Patching the files.
- Integration into the Groundwork web interface.
- Integration with the Guava SSO.
- Basic configuration.
- Testing!
- Overlib feature support
- Final results
Requirements
The Groundwork installation and configuration will not be discussed here. I assume that you’ve a Groundwork server running and already polling network devices via check_snmp. A service must be created to use this plugin and to save a RRD file via the performance configuration tab:
$RRDTOOL$ create $RRDNAME$ --step 300 --start n-1yr \
DS:in:COUNTER:1800:U:U \
DS:out:COUNTER:1800:U:U \
DS:indis:COUNTER:1800:U:U \
DS:outdis:COUNTER:1800:U:U \
DS:inerr:COUNTER:1800:U:U \
DS:outerr:COUNTER:1800:U:U \
RRA:AVERAGE:0.5:1:2880 RRA:AVERAGE:0.5:5:4032
In the default Groundwork configuration, the service snmp_if_1 does that. You can use it as a good example.
Weathermap installation
There are two versions of Weathermap, the old one was written in Perl and is not maintained anymore. Be sure to install the current one, based on PHP! The most important feature is the capability to read RRD files!
Download the archive and uncompress it in the Groundwork web server root directory:
$ cd /usr/local/groundwork/apache2/htdocs
$ wget http://www.network-weathermap.com/files/\
php-weathermap-0.95a.zip
$ unzip php-weathermap-0.95a.zip
$ chown -R nagios:nagios weathermap
Patching the files.
There are two changes to make on installed files:
The /usr/local/groundwork/etc/php.ini file must be patched to reflect the right include directory (to let php find the PEAR classes). Adapt the include_path as follow:
$ grep $include_path /usr/local/groundwork/etc/php.ini
include_path = ".:/usr/local/groundwork/share/php:/usr/local/\
groundwork/share/pear"
The main weather map script must be patched to use the right PHP binary:
$ head +1 /usr/local/groundwork/apache2/htdocs/weathermap/\
weathermap
#!/usr/local/groundwork/bin/php
Warning! During generation of map, my PHP binary core dumped. After some debugging, I found that the line 445 in WeatherMapNode.class.php was the problem:
imagefill($node_im, 0, 0, $nothing);
Maybe an incompatibility with the gd library provided by Groundwork? Don’t care, just comment it!
Finally, patch the following file: lib/datasources/WeatherMapDataSource_rrd.php. To be able to use the RRD files generated by Groundwork, you need to change the dsnames used in those files. The defaults are “traffic_in” and “traffic_out” but Groundwork uses “in” and “out”. Check around line 275:
$dsnames[IN] = "in";
$dsnames[OUT] = "out";
At this time, you should be able to create a basic map and generate a image:
$ cd /usr/local/groundwork/apache2/htdocs/weathermap
$ cat _END_ >>configs/test.cfg
NODE node1
   LABEL Node1
   POSITION 100 100
NODE node2
   LABEL Node2
   POSITION 200 200
LINK node1-node2
   TARGET /usr/local/groundwork/rrd/node1_SNMP_If_1.rrd
   NODES node1 node2
   BANDWIDTH 1M
_END_
$ ./weathermap --config=config/test.cfg
If everything was ok, you should find a weathermap.png in the Weathermap directory.
Integration into the Groundwork web interface
Groundwork provides a nice tool called Wrappit. It allows you to create Groundwork packages for integration of external web applications into the Groundwork GUI (with optional a SSO feature). We will use this tool to create a Weathermap package.
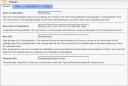 |
First, we create the application: name, description, the base URL (must end with a trailing slash!) and the welcome URL. |
 |
Next, we create the context menu which will be displayed on top of screen. I defined two menus: the default map and the Weathermap editor. If you decide to generate more maps, you can add them here. |
 |
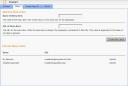
For security, we enable the SSO. It means that visitors must be logged into Groundwork to access the /weathermap/ directory tree. |
 |
Ready to export and install the new Guava package! |
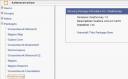 |
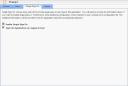
We are now ready to install the newly created package via the Administration menu. |
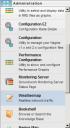 |
Add the new package to roles to grant access to your users and a new item will appear in the main Groundwork menu! |
Integration with the Guava SSO
For a successfull integration whitin the Groundwork interface, we need to change the Apache httpd.conf to enable the SSO (Single Sign On). Edit the /usr/local/groundwork/apache2/conf/httpd.conf and add a new <directory> section:
<Directory "/usr/local/groundwork/apache2/htdocs/weathermap">
        AuthType Basic
        require valid-user
        TKTAuthLoginURL http://xx.xx.xx.xx/monitor/index.php
        TKTAuthCookieName weathermap_auth_tkt
        TKTAuthTimeout 0
</Directory>
Don’t forget to replace the “x” by your Groundwork server IP address. Restart your Apache and log in again.
Basic configuration
Weathermap provides a web based map editor but, it does not support the complete set of Weathermap options and does not have access to the Groundwork RRD files. I suggest to use a much more powerful editor: vi! The complete set of available keywords won’t be reviewed here, check the online documentation for more information. Create your first map and save it in /usr/local/groundwork/apache2/htdocs/weathermap/configs/nynetwork.conf. You configuration must contain the following keywords:
HTMLOUTPUTFILE  mynetwork.html
IMAGEOUTPUTFILE mynetwork.png
They mean that Weatermap will generate correct filenames. Be sure to use the same name as the one given during the package configuration (see above)! Also, check carefully the file permissions. They sould be readable by the Apache server UID (nobody in my case).
Then, you can create a crontab to generate the map at regular interval:
# Groundwork: Generate the Weathermap default map
*/5 * * * * (cd /usr/local/groundwork/apache2/htdocs/weathermap; \
./weathermap --config configs/mynetwork.conf >>weathermap.log)
Wait five minutes and check if files were properly created in /usr/local/groundwork/apache2/htdocs/weathermap.
Testing!
Go back to the Groundwork web interface, select your Weathermap menu and you should see your brand new map! (by default, the generated HTML code forces a refresh every 300″.
Overlib feature support
Weathermap has a feature to add pop up graphs to your network maps. When you move the mouse over a link, it pop ups a small window with a graph (or any other URL). It’s a very convenient way to show traffic history for a specific link. To enable the feature, use the OVERLIBGRAPH keyword in the config file:
LINK node1-node2
   TARGET /usr/local/groundwork/rrd/node1_SNMP_if_1.rdd
   NODES node1 node2
   OVERLIBGRAPH http://url
Groundwork generates performance graphs on the fly. By default, there is no “ready to use” graphs available on the filesystem. A quick way to solve this issue is to create a small script which will generate history graphs for Weathermap.
Create a new directory in the Weathermap tree:
$ mkdir /usr/local/groundwork/apache2/htdocs/weathermap/cache
$ chown nagios:nagios \
/usr/local/groundwork/apache2/htdocs/weathermap/cache
Then, create the script. Basically, it will parse your map configuration file and generate PNG graphs based on the RRD files it found:
#!/bin/bash # # Generate performance graphs based on RRD files found in # Weahter map config files # # Usage: gen_gfx.sh# CONFIGPATH=/usr/local/groundwork/apache2/htdocs/weathermap/configs OUTPATH=/usr/local/groundwork/apache2/htdocs/weathermap/cache CONFIG=$1 [ -r $CONFIGPATH/$CONFIG ] || exit 1 grep rrd $CONFIGPATH/$CONFIG | while read LINE do set $LINE RRDFILE=$2 GFXOUTPUT=`basename $RRDFILE` /usr/local/groundwork/bin/rrdtool graph \ $OUTPATH/$GFXOUTPUT.png \ --width 250 \ --height 100 \ --title "Interface Traffic" \ --vertical-label "Bytes/s" \ --end now \ --start now-7200s \ DEF:in=$RRDFILE:in:AVERAGE \ DEF:out=$RRDFILE:out:AVERAGE \ AREA:in#00eb0c:Incoming \ LINE:out#1000ff:Outgoing done
Add a new crontab to generate the graphs every five minutes:
0/5 * * * * (cd /usr/local/groundwork/apache2/htdocs/weathermap/\
cache; ./gen_gfx.sh rootshell.conf >/dev/null)
Final results
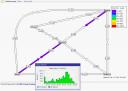 |
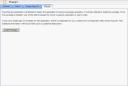
Here is the final map! Feel free to post comments or suggestions. Remember: it worked for me, you will probably have to adapt the procedure described above to match your own setup. Enjoy! |
Hello Allamitro,
Sorry, I can’t as I don’t have a Groundwork version 6 available! I stopped to follow this product for multiple reasons.
Can you please write an article about doing that integration version 6 since it seems wrapit is not there and its been modified or do we have do all the integration oin version 5 then upgrade to 6
TG is a dataparty event in Norway happening in the easter. Here is a map of the traffic there: http://stats.tg08.gathering.org/
This year might be the last TG because the goverment says it’s not a culture event and forcing it to pay tax.